
Require Terms & Conditions before checkout
How to enable a required Terms & Conditions checkbox in the cart drawer — Cart Editor → Settings → Other Settings.
A Terms & Conditions checkbox makes customers explicitly agree to your store's terms before they can check out. It's especially useful for regulated industries (alcohol, supplements, age-restricted goods), pre-orders with delayed shipping, and high-ticket items where you want clear acknowledgment of your returns and exchanges policy.
When enabled and required, customers must tick the checkbox before they can check out — if they click the checkout button without ticking it, they see an error message instead and checkout is blocked.
Step 1: Open Cart Editor → Settings
In the Oxify app, go to Home and click Manage Cart Drawer (or Set up Cart Drawer) on the Cart Drawer card to open the Cart Editor. In the Cart Editor's left sidebar, click Settings.
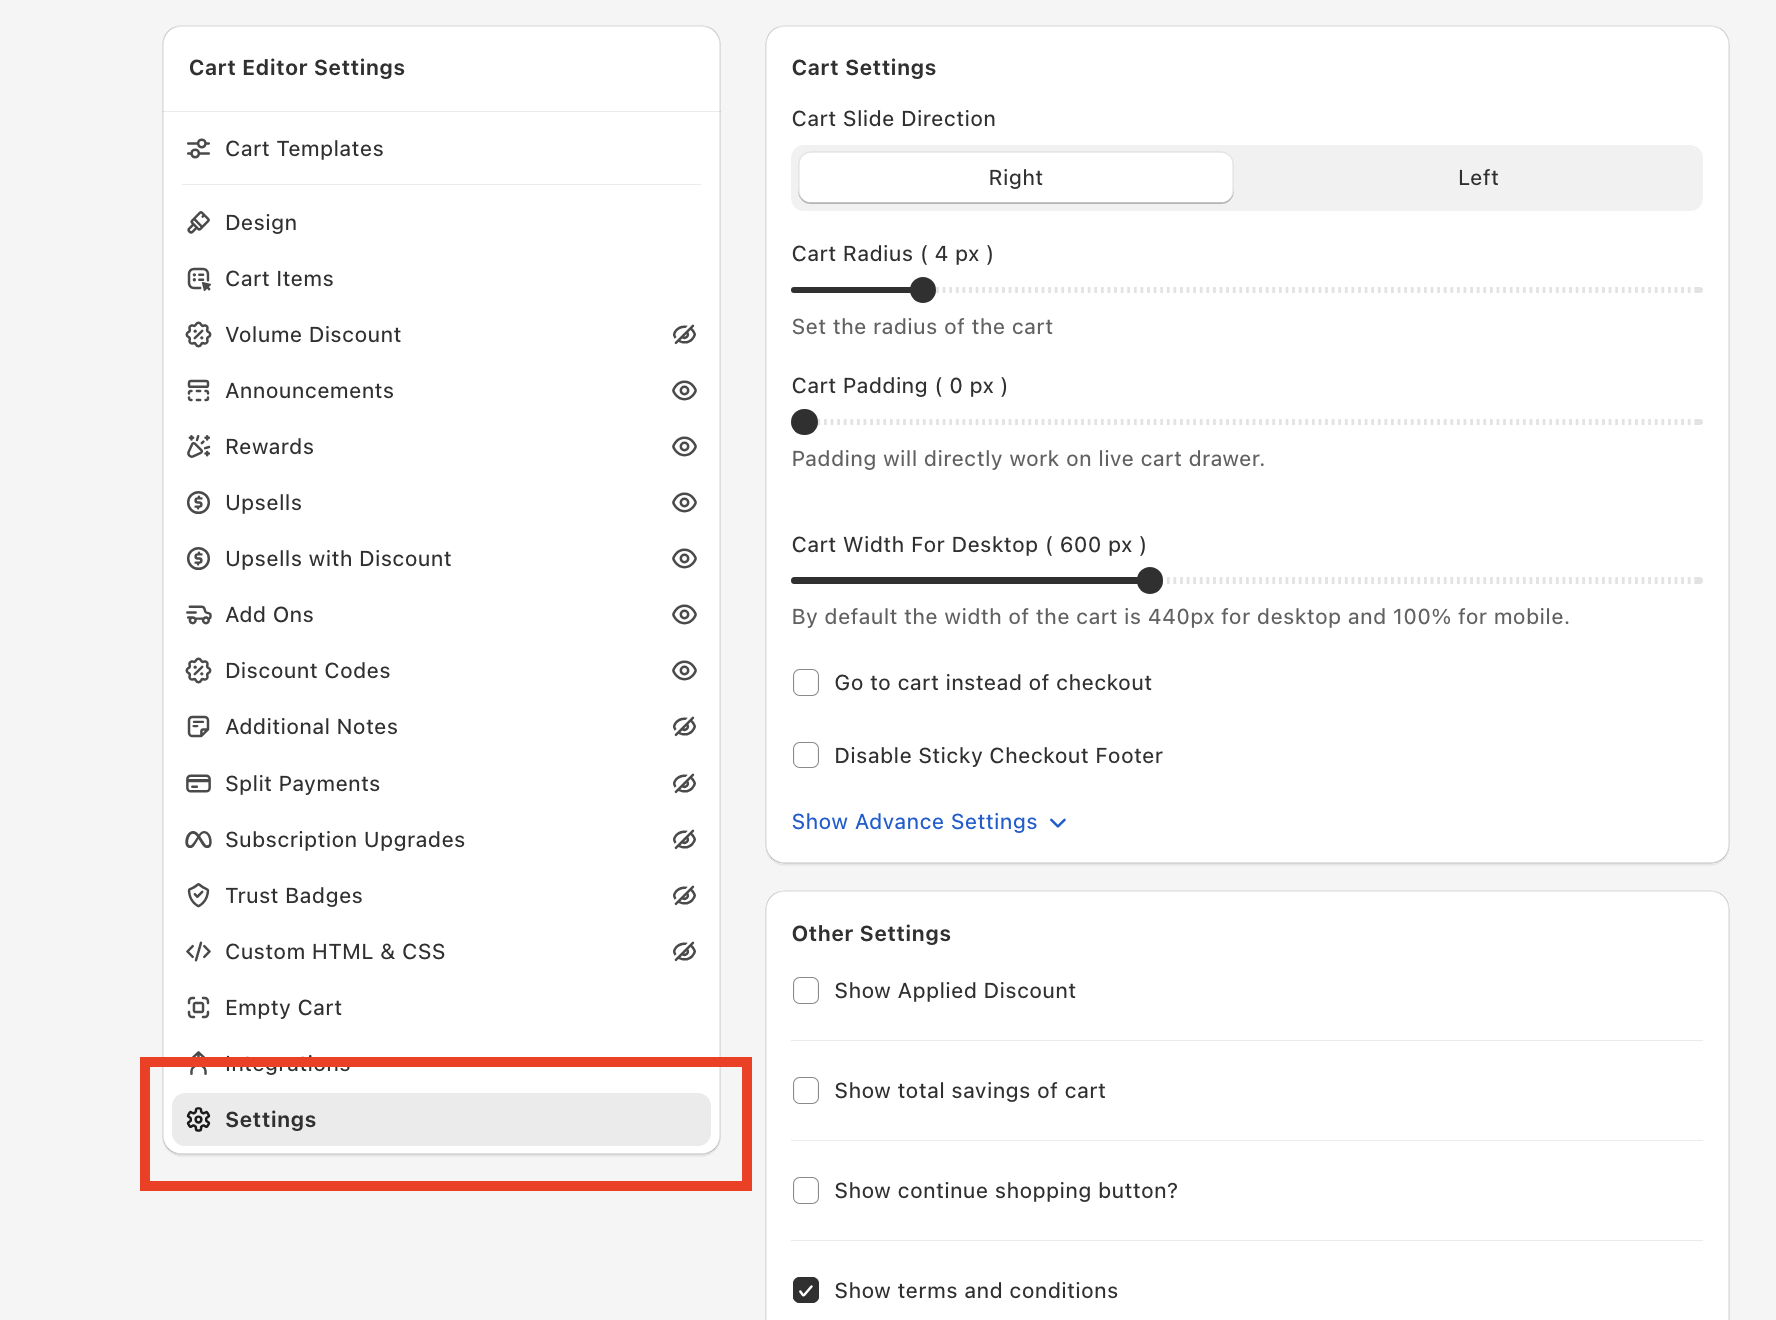
The Settings panel is made of several cards: Cart Settings, Other Settings, Discount Settings, and Upsell Product Exclusions. Terms and conditions controls live in Other Settings.
Step 2: Enable "Show terms and conditions"
Scroll down in the Settings panel until you find the Other Settings section. Check the Show terms and conditions checkbox.
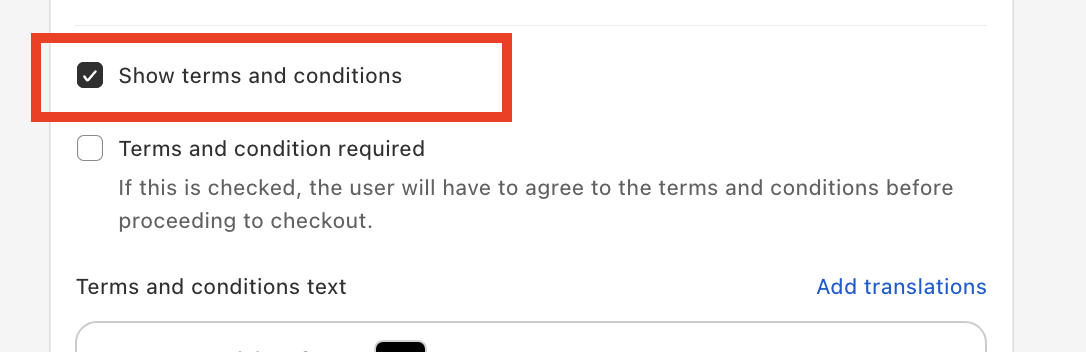
Once enabled, additional configuration options appear: Terms and condition required, the rich text editor for your terms text, font size, checkbox color, and the error message.
Step 3: Decide whether the checkbox is required
Below "Show terms and conditions", check the Terms and condition required checkbox (it's unchecked by default).
The UI explicitly states: "If this is checked, the user will have to agree to the terms and conditions before proceeding to checkout."
- Required (checked) — the customer cannot proceed to checkout until they tick the box; clicking checkout without it shows your error message. This is the standard setup for legal compliance.
- Not required (unchecked) — the checkbox shows but is purely informational. Checkout works whether the box is ticked or not.
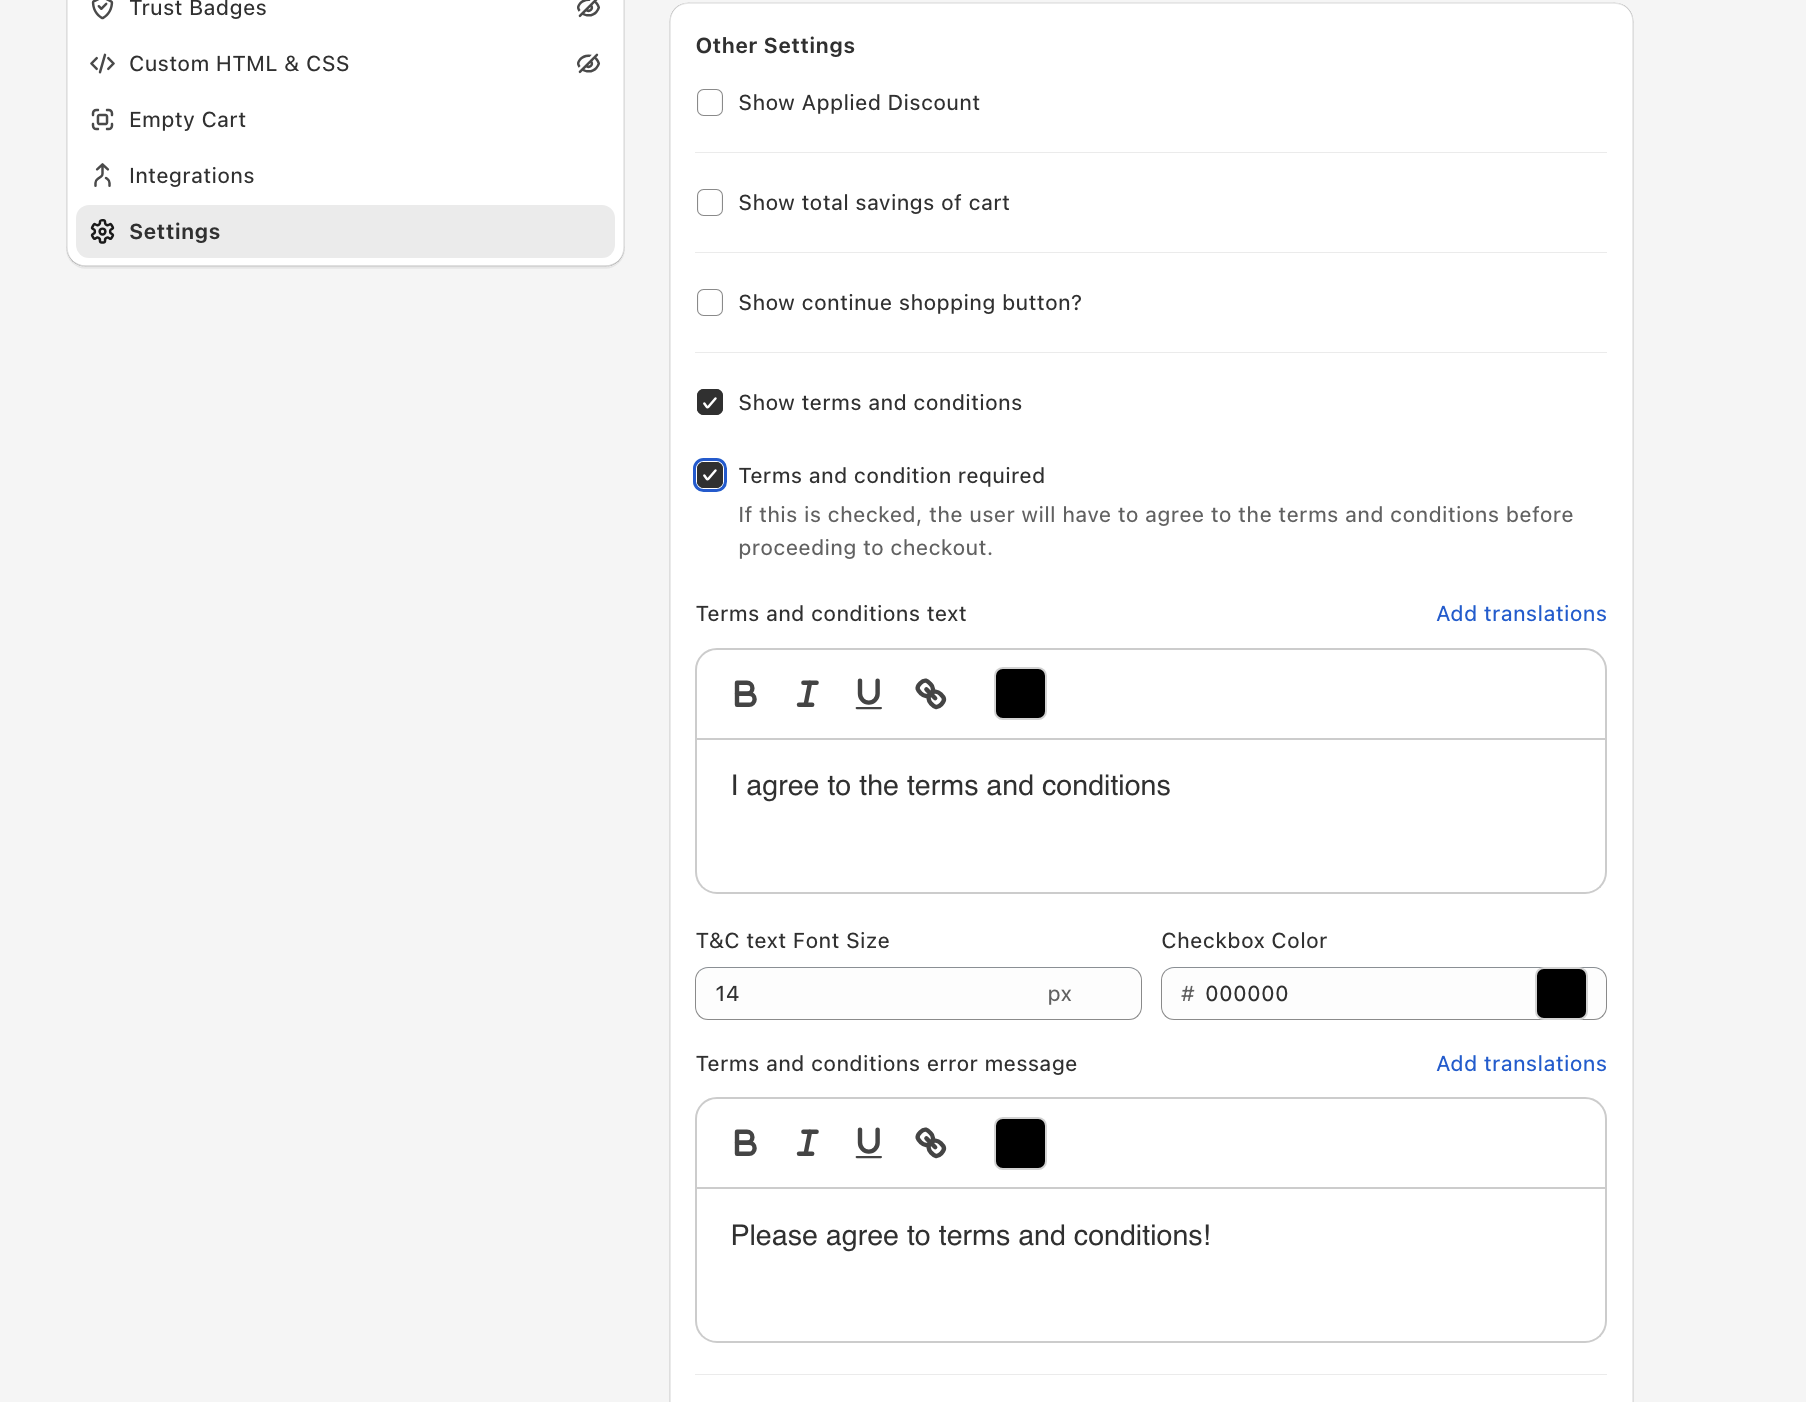
If the whole point of the checkbox is to enforce agreement (which is usually why merchants enable this feature in the first place), keep this checked.
Step 4: Write your terms and conditions text
Below the required toggle is a rich text editor labeled Terms and conditions text. This is the text that appears next to the checkbox.
[Screenshot: Terms and conditions text rich text editor showing default "I agree to the terms and conditions"]
The default text is "I agree to the terms and conditions". The editor supports:
- Bold, italic, and underline formatting
- Hyperlinks — link to your full Terms of Service or Refund Policy page
- Text color
Best practice: link to the full policy page so customers can actually read what they're agreeing to. Common patterns:
- "I agree to the Terms of Service" — with "Terms of Service" linked to
/policies/terms-of-service - "I have read and accept the Refund Policy and Terms" — two links to the relevant pages
- "I confirm I am 21 or older" — for age-restricted goods (no link needed)
To add a link: highlight the words you want to make clickable and click the link icon (🔗) in the editor toolbar. Paste the URL — for Shopify policy pages, use the relative paths like /policies/terms-of-service, /policies/refund-policy, or /policies/privacy-policy.
Add translations
If you sell in multiple languages, click Add translations in the top-right of the editor. Add per-language overrides so French customers see French terms text, German customers see German, and so on.
Step 5: Style the checkbox
Below the text editor are two style fields:
- T&C text Font Size (px) — default 14. Sets the size of the terms text. 14px is a balanced default; 12px feels lighter, 16px feels more prominent. Don't go below 12px — small legal text is hard to read on mobile.
- Checkbox Color — hex color (default
#000000, black). Sets the color of the checkbox itself when ticked. Use a color that contrasts well with your cart background. Black (#000000) is the safest choice; brand-colored checkboxes can blend in if your cart uses similar tones.
Below the styles, Terms and conditions error message is the message shown when a customer clicks checkout without ticking the box. The default is "Please agree to terms and conditions!". It's a rich text field too, with its own Add translations option.
Step 6: Save and test
Save your changes, then open your storefront in incognito mode and add a product to the cart. The terms checkbox should appear in the checkout area, above the subtotal and the checkout button. Try clicking checkout without ticking the box — if you set "Terms and condition required" to checked, the checkout should be blocked and your error message should appear.
Once a shopper ticks the box, it stays ticked for the rest of that browser session. To test the unticked state again, open a new incognito window.
When to use this
A required terms checkbox makes sense in these scenarios:
- Regulated industries — alcohol, supplements, CBD, vaping, age-restricted goods. Often legally required to confirm the customer is of legal age.
- Pre-orders with delayed shipping — make customers acknowledge they understand the wait time before they buy.
- Final sale items / no-returns categories — beauty, intimate goods, perishables — get explicit acknowledgment that the customer can't return the item.
- High-ticket purchases — anything over a few hundred dollars where you want a clear paper trail of agreement to your refund policy.
- Subscription products — confirm the customer understands they're signing up for recurring billing.
For most ordinary stores, a required terms checkbox adds friction without much upside. If you're not in one of the above categories, leave this feature off — every extra click between cart and checkout costs conversions.
Keep your terms text short. The whole point is for customers to understand what they're agreeing to — a wall of legal text inside a cart drawer just gets ignored. One sentence with a link to the full policy works better than a paragraph of fine print.
If your terms are complex enough that they need a paragraph of explanation, that paragraph belongs on your dedicated policy page — not next to the checkout button.