
Manage your timers
Turn timers on and off, edit, duplicate, copy a timer ID and delete timers from your dashboard list, and update older timers.
Once you have made a timer, you look after it from the timers list on your dashboard. This page covers every button in a row: the on and off switch, the name, and the three icon buttons in the Actions column.
Where to find it: Oxify Countdown → timers list
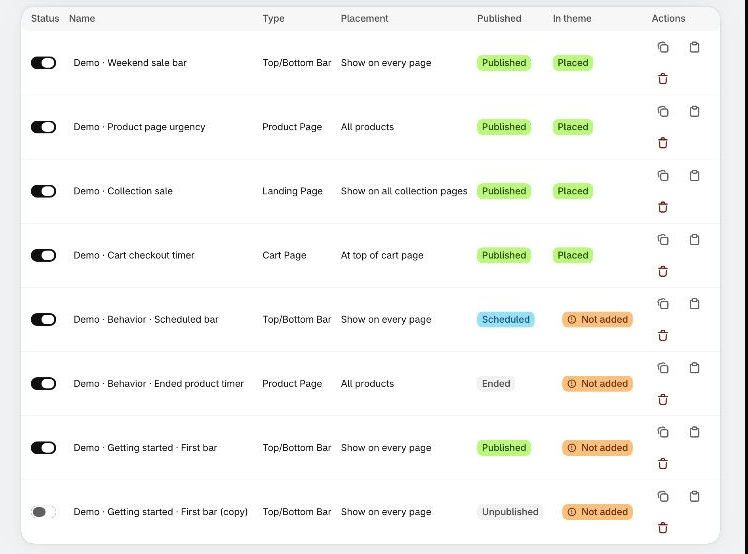
What you can do from the list
| To do this | Do this |
|---|---|
| Turn a timer on or off | Click the switch in the Status column. |
| Edit a timer | Click its name. |
| Add a timer to your theme | Click Not added in the In theme column. |
| Make a copy of a timer | Click the first icon in Actions, two overlapping squares. |
| Copy a timer's ID | Click the second icon, a clipboard. |
| Delete a timer | Click the third icon, a red trash can, then confirm. |
| Update an older timer | Click Update in Actions. |
The three icons have no text. Their names, which a screen reader reads out, are Duplicate, Copy timer ID and Delete.
Turn a timer on or off
Click the switch in the Status column. You see Timer activated successfully or Timer paused successfully. See Preview and publish for the details and for what each status badge means.
Edit a timer
Click the timer's name. The Countdown Editor opens with the timer's saved settings. Change what you need.
- Click Save in the Unsaved changes bar to keep your changes, or Discard to throw them away. The bar covers the editor's close button, so use one of them before you close the editor.
- Saving keeps the timer on or off as it was.
- The editor has no setting for the timer type. To use another type, create a new timer.
See Preview and publish.
Duplicate a timer
Use a copy when you want a new campaign that looks like an old one.
In the timer's row, click the duplicate icon in the Actions column. You see Timer duplicated.

Find the copy at the bottom of the list. Its name is the original name followed by (copy), for example Demo · Getting started · First bar (copy). Its switch is off, its status is Unpublished and its In theme cell says Not added.
Click the copy's name. Change the name, the text and the dates. Then click Save, and Publish when you are ready.
Add the copy to your theme. See Add the timer to your theme.
The copy has the same content, design, timing, placement and translations as the original, and it gets its own timer ID. It starts off, so it cannot go live before you have looked at it. The copy is not in your theme, even if the original is.
Check the dates on a copy
A copy keeps the original's Ends At date and any Schedule publishing dates. If they have passed, the app will not save the copy until you pick new ones.
Copy a timer ID
Click the clipboard icon. You see Timer ID copied to clipboard. If your browser blocks copying, the app shows Failed to copy timer ID in a red banner instead.
The same ID is in the Timer ID card on the Placement tab of the editor. It has its own copy button. Before the first save, the card says Save or Publish to show timer ID.

You rarely need the ID. It is a long code that identifies one timer, and it is part of the one-line snippet that Get code copies. You don't need the ID to put a timer in your theme, because the app block's list shows your timers by name. See Custom position.
Delete a timer
In the timer's row, click the red trash can icon in the Actions column.
A window called Delete Countdown Timer asks Are you sure you want to delete and the timer's name, This action cannot be undone. Click Cancel to keep the timer, or Delete to remove it.
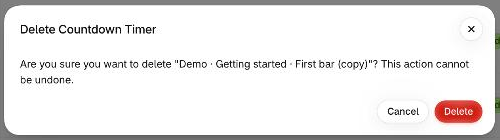
After Delete you see Timer deleted successfully and the row is gone.

Deleting cannot be undone
A deleted timer is gone, with its design and schedule. If you only want to stop a timer for a while, turn its switch off instead.
If the timer's app block is still in your theme, the block stays. In the theme editor it shows a red alert, because the timer it points to no longer exists, and it shows nothing on your store. It still counts in App blocks on the dashboard. Open the theme editor, select the block, click Remove block and save. See Add the timer to your theme.
Update an older timer
Timers made with an earlier version of the app show a Needs update badge next to their name and an Update button in the Actions column. This state cannot be recreated on the demo store, so it is not pictured here.
Find the row with the Needs update badge and click Update.
The app updates the timer once and keeps every setting you chose. You see Timer updated. Opening the editor. and the editor opens.
Check the timer, then add its app block to your theme. See Add the timer to your theme.
- Shoppers see no change. The timer stays where it is on your storefront, during and after the update.
- You cannot edit it before the update. If you click the name, the app says Update this timer to edit it. If you open it some other way, the editor shows This timer needs updating, with Update and edit, Delete timer and Back to timers.
- A copy is updated for you. If you duplicate an older timer, the copy is made on the current structure. The original stays as it is until you update it.
- If something goes wrong you see We couldn't update your timers. Please try again.
The timer keeps showing through Automatic placement until its app block is in your theme. See Automatic placement.
Keep your list tidy
- Give each timer a clear name, such as
Black Friday top bar. The name shows only to you, in this list and in the theme editor's timer picker. - Shopify Flow finds timers by name, so keep names unique. See Shopify Flow actions.
- Delete the copies and tests you no longer need.