Weekend sale bar
Build a countdown bar for the top of every page that counts down to the end of your sale and links to your products. Every setting and screenshot included.
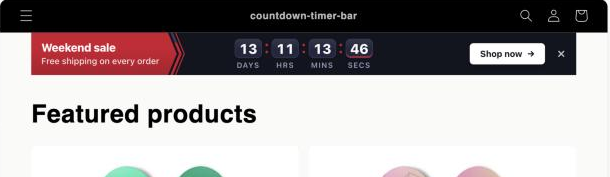
In this recipe you build a slim bar that sits at the top of every page of your store. It shows a title, a short line under it, a countdown to the moment your sale ends, a Shop now button and a close button. Use it for any sale that has a real end time, such as a weekend sale or a holiday offer.
Where to find it: Oxify Countdown → Create timer → Top/Bottom Bar
What you'll build
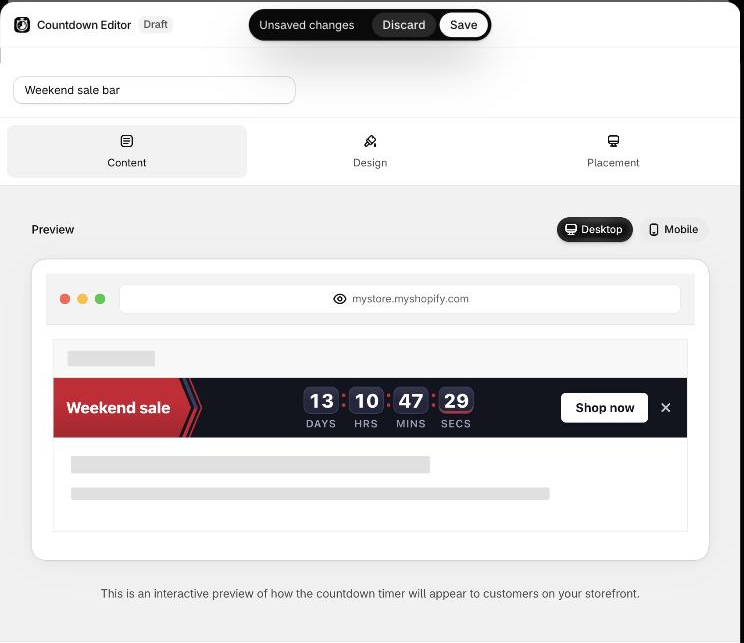
On a computer the bar is one row. The title and subheading are on the left, the countdown is in the middle, and the button and the close button are on the right.
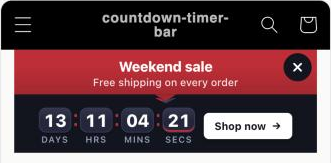
On a phone the same bar stacks. The words come first, then the countdown and the button.
Before you start
Check that the app embed is on. It is the master switch for every timer. See Enable the app embed.
Settings at a glance
Use these values as they are, or swap in your own words and time.
| Where in the editor | Field | Value |
|---|---|---|
| Create timer | Timer type | Top/Bottom Bar |
| Name box at the top | Timer name | Weekend sale bar |
| Content tab → Template | Template | Split Bar |
| Content tab → Content | Title | Weekend sale |
| Subheading | Free shipping on every order | |
| Timer labels | Leave as they are: Days, Hrs, Mins, Secs | |
| Call to action | Button | |
| Button Text | Shop now | |
| Call to action URL | /collections/all | |
| Show close button | Ticked | |
| Content tab → Timing | Timer Type | Countdown to a date |
| Ends At | The day your sale ends, at 11 : 59 PM | |
| Content tab → Publishing | Schedule publishing | Off |
| Content tab → When it ends | Once Timer Ends | Hide Timer From User |
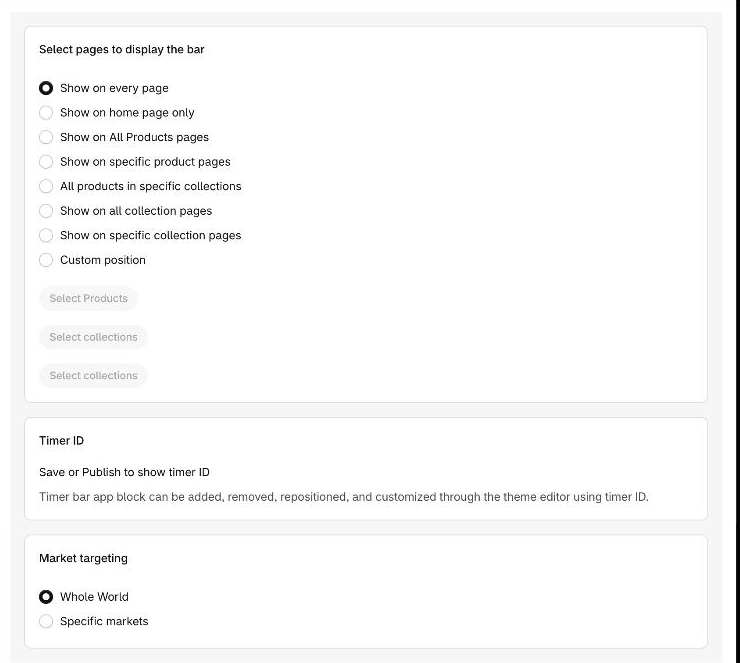
| Placement tab → Select pages to display the bar | Show on every page | |
| Placement tab → Market targeting | Whole World | |
| Design tab | Everything | Leave as the template sets it |
Build the bar
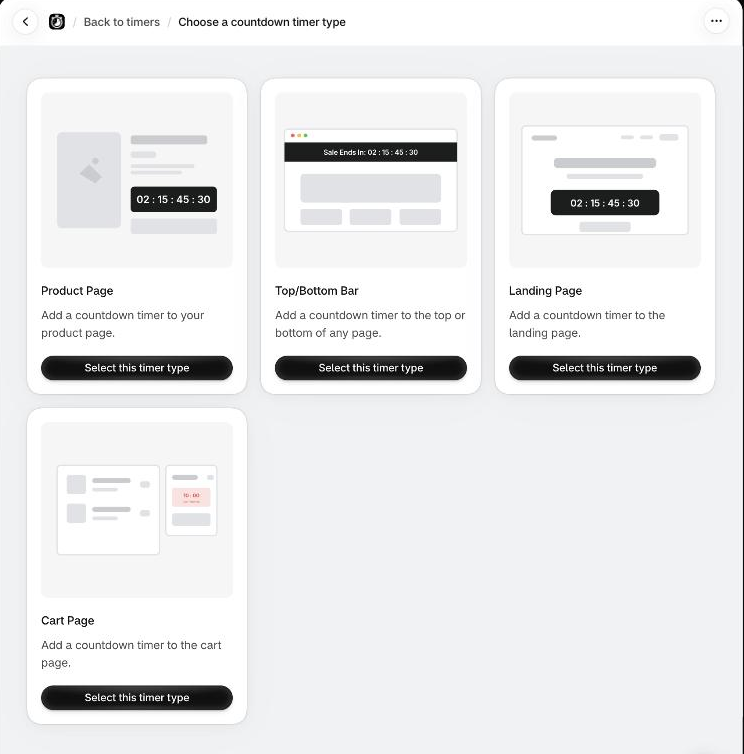
Create the timer. In the app, click Create timer. On Choose a countdown timer type, click Select this timer type under Top/Bottom Bar. The Countdown Editor opens in a window over the page. See Choose a timer type and Top/Bottom bar timer.
Name it. Select the text in the name box at the top of the editor and type Weekend sale bar. The name is only for your timer list. Shoppers never see it.
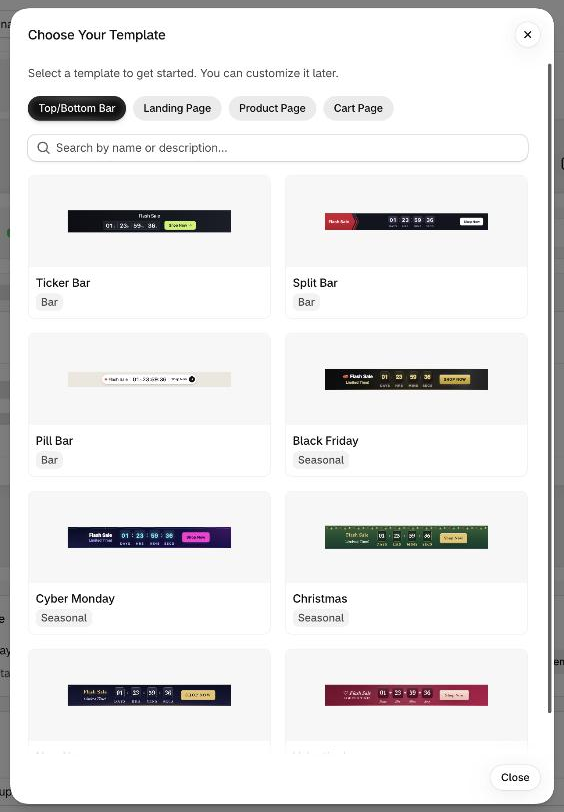
Pick the Split Bar template. On the Content tab, click Browse templates in the Template card. The gallery opens on Top/Bottom Bar. Click Split Bar. The window closes by itself and the Template card shows the new name. See Templates.
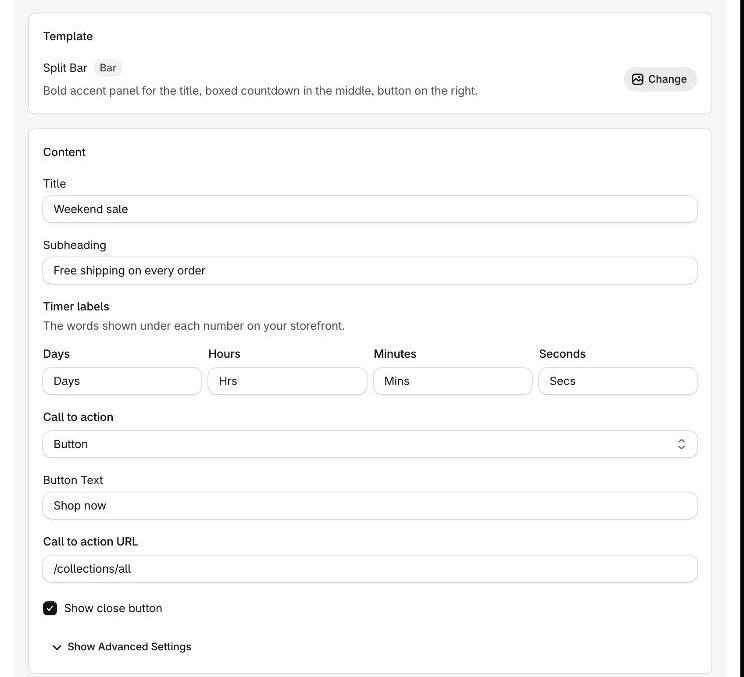
Write the words and the button. In the Content card, fill in these fields. Leave Timer labels as they are.
- Title:
Weekend sale - Subheading:
Free shipping on every order - Call to action: keep Button. Set Button Text to
Shop nowand Call to action URL to/collections/all. - Show close button: tick it.
Details are in Title and subheading, Call to action, Close button and Timer labels.
The preview at the top of the editor changes as you type. It shows the title only. On your store the subheading shows under the title.
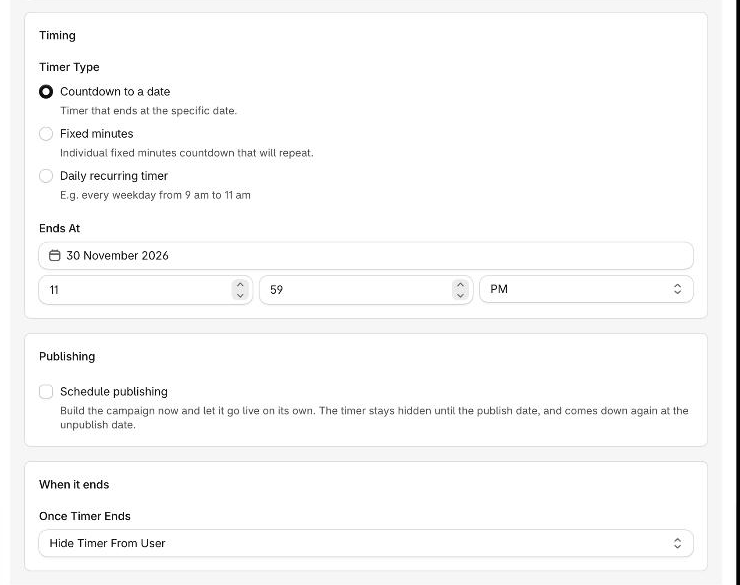
Set when the sale ends. Scroll to the Timing card. Timer Type is already Countdown to a date. Click the Ends At date box and pick the day your sale ends. Then set the time in the three boxes below it: the hour, the minutes, and AM or PM. For example 11, 59 and PM. A new timer comes with an Ends At date already filled in, so treat it as a placeholder and always set your own. The time uses your browser's time zone, which is usually your computer's clock.
Leave Once Timer Ends in the When it ends card on Hide Timer From User. The bar comes down when the sale is over. See Countdown to a date and Once the timer ends.
Choose where the bar shows. Open the Placement tab. Under Select pages to display the bar, keep Show on every page. Keep Market targeting on Whole World.
A new bar has no top or bottom setting. It sits where you place its app block in your theme. In the last step you place it in the header, which is the top of the page. See Top/Bottom bar placement and Market targeting.
Save to publish. Click Save in the Unsaved changes bar at the top of the editor. A new timer is published by its first save, so the badge next to Countdown Editor changes from Draft to Live. The bar is now on in the app, but it is not on a page yet. To have a bar go live on a later day, set Schedule publishing in the Publishing card before you save. See Schedule publishing. For the save and publish buttons, see Preview and publish.
Add the bar to your theme. Publishing does not put the bar on a page. You place it with the Oxify Countdown Timer app block. Click the Not added in theme badge beside the timer name.
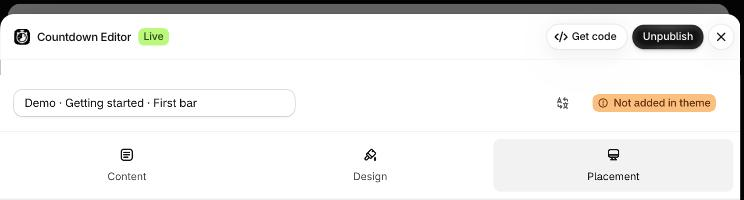
The theme editor opens in a new browser tab on your Home page. A new Apps section with the Oxify Countdown Timer block is already in the Header group.
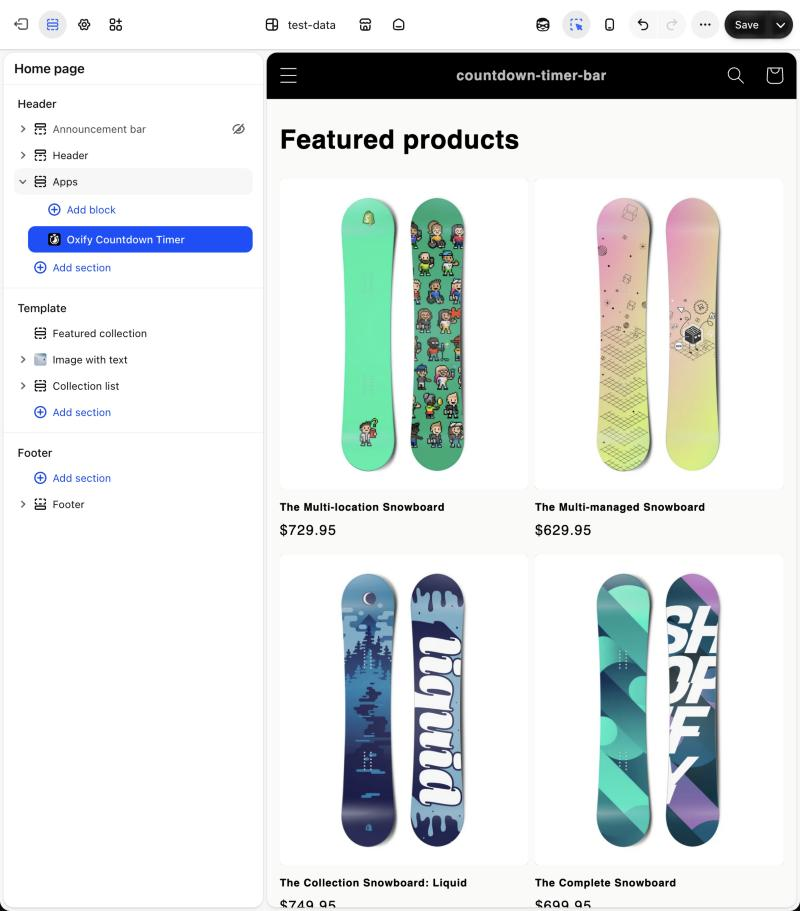
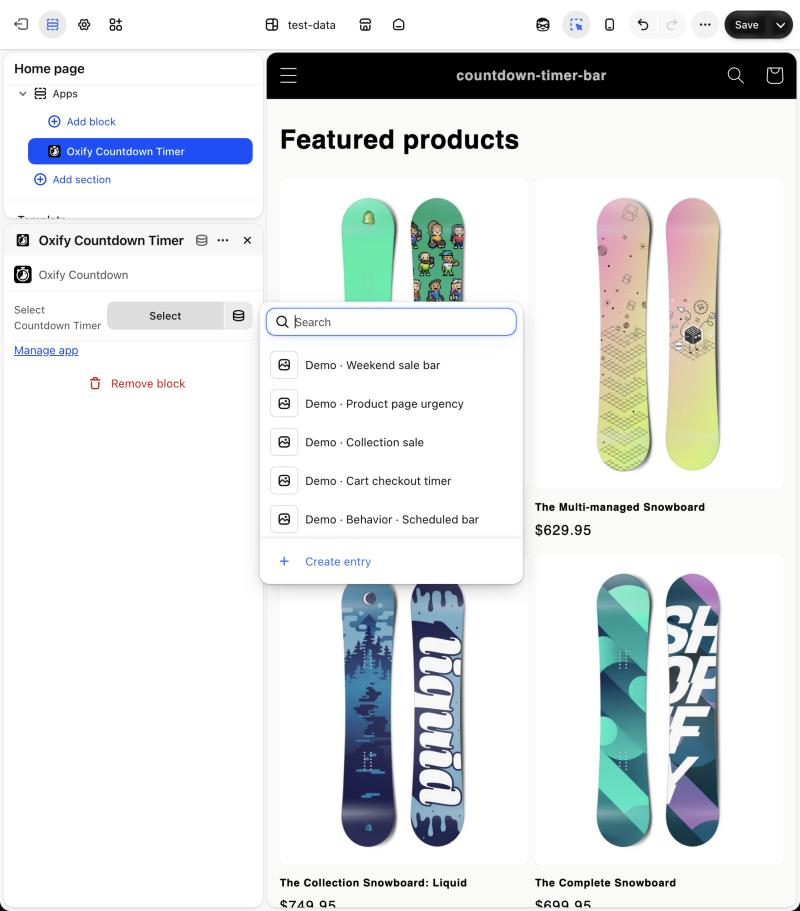
Click the block in the left panel. Next to Select Countdown Timer, click Select and pick Weekend sale bar from the list. Do not use Create entry at the bottom of the list.
Click Save at the top right of the theme editor. The button turns grey when the theme is saved. The full steps are in Add the timer to your theme.
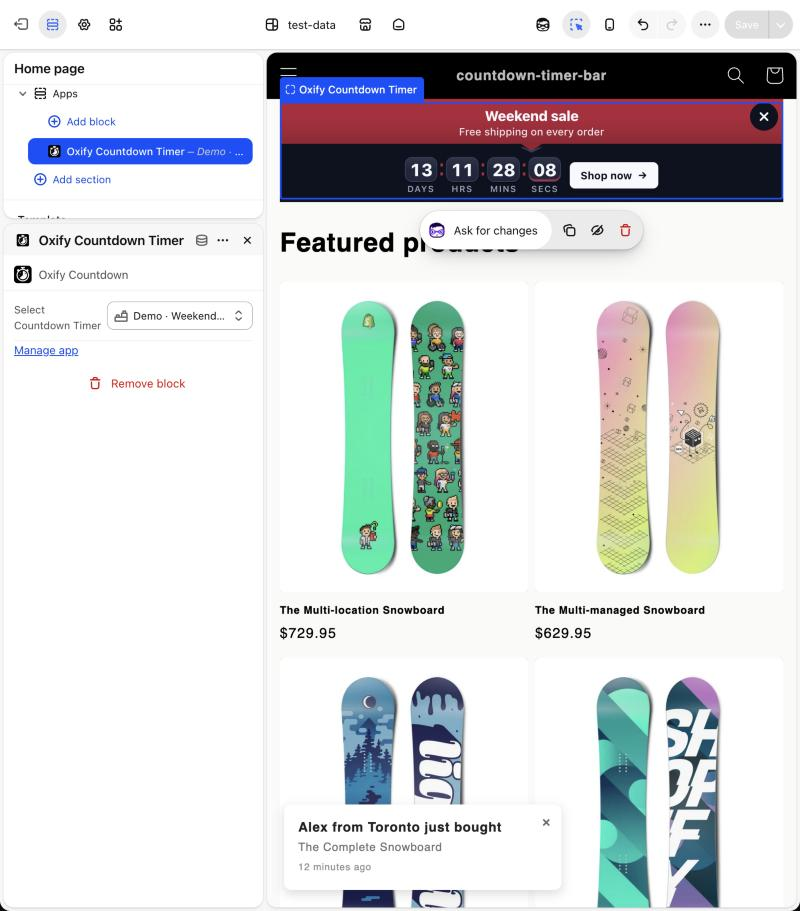
Check it on your store
A timer reaches shoppers only when all of these are true: the app embed is on, the timer is Published, and its app block is saved in your live theme with the timer selected.
In the app, look at the timers list. The row for Weekend sale bar should show Published and Placed in the In theme column.
Open your store in a private browser window. A private window starts with no saved data, so you see the bar as a new shopper does. If your store is still password protected, you see the password page first.
Open any page. The bar is at the top. Check the countdown, then click Shop now to make sure it opens your products.
Click the X. The bar closes and stays closed in that browser for up to 7 days. Open a new private window to see it again. See Close button.
Make it your own
- Try another look. Click Change in the Template card. Ticker Bar is a slim bar where the title and subheading take turns beside a compact clock. Pill Bar is one rounded pill with a live dot, the title, the clock and a link. The seasonal templates work as bars too.
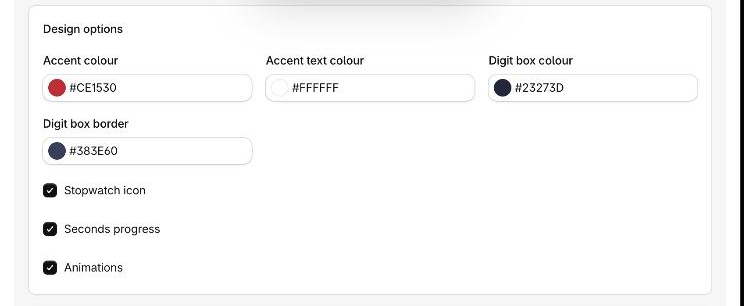
- Change the colors. Open the Design tab. For Split Bar, the Design options card has Accent colour, Accent text colour, Digit box colour and Digit box border. See Design options.
- Make the whole bar a link. Set Call to action to Make entire bar clickable and keep the Call to action URL. The button goes away and a click anywhere on the bar opens the link.
- Say something when the sale ends. Set Once Timer Ends to Show Custom Title and write a Custom Title, such as
This sale has ended. The bar stays up with your message in place of the title, and the clock stays at zero. - Keep the bar in view, or move it to the bottom. On the Design tab, tick Sticky bar in the Positioning card to keep the bar on screen while shoppers scroll. For a bar at the bottom of the page, add the app block in the Footer group of your theme instead of the Header group. See Positioning and sticky bar.
This is the Design options card for Split Bar:
If it doesn't show
Work through these first, then read Timer not showing.
- The app embed is off. On the dashboard, the Theme extension card shows App embed as Inactive. Turn it on, as in Enable the app embed.
- The timer is off. Its switch in the timers list is off, or its status is not Published.
- The block is not saved. The row says Not added, or the block has no timer selected. Save the theme with the timer picked.
- You closed the bar yourself. It stays closed in that browser for up to 7 days. Use a private window.
- The sale has ended. With Hide Timer From User, the bar comes down at the end time.