
Turn it on and save
The editor, the two switches that must both be on, and the buttons that compile, format, and reset.
The card at a glance
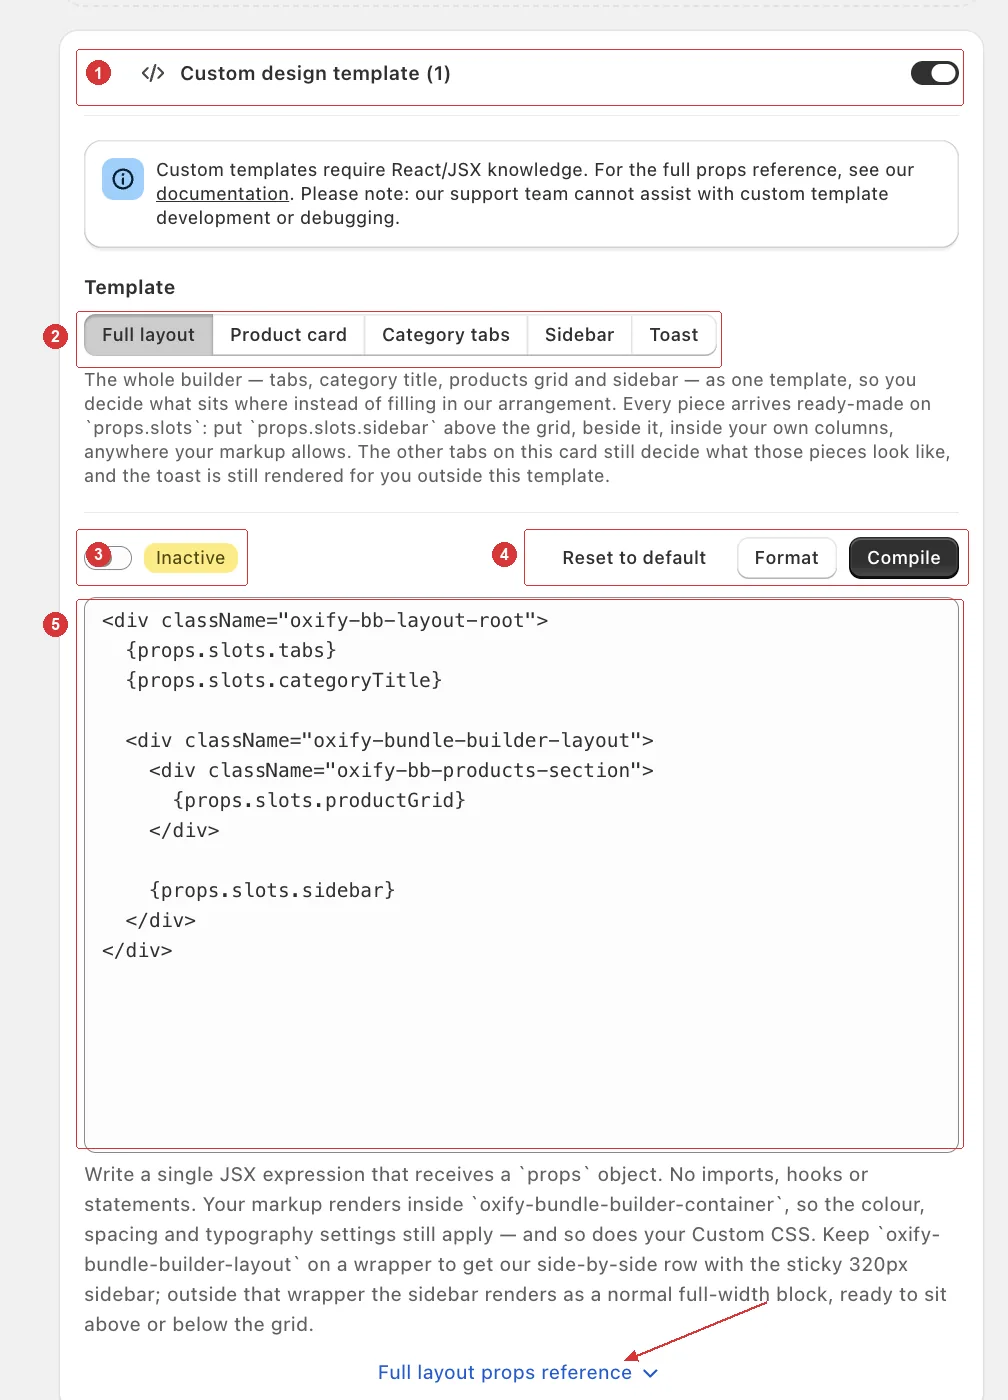
Everything on this card, in the order you'll use it:
| Control | What it's for | |
|---|---|---|
| 1 | Master switch | Turns the whole feature on. Off by default. The title shows a count once templates are active — Custom design template (1). |
| 2 | Template tabs | The five pieces you can replace: Full layout, Product card, Category tabs, Sidebar, Toast. Each is independent. |
| 3 | Per-template switch | Turns this template on. Shows Active or Inactive. |
| 4 | Reset / Format / Compile | Restore the built-in code, tidy indentation, or build your code into the preview. |
| 5 | Code editor | Pre-filled with a working copy of the built-in design, so you edit rather than start blank. |
The arrow points to the props reference — a collapsible list of every value that template receives. It's generated from the app itself, so it's always accurate.
The info banner is telling the truth
The blue banner notes that support can't help debug custom templates. That's a real limit, not boilerplate — this is the one part of the app where you're writing the code.
Edit your first template
Open your bundle builder and go to the Design tab.
Find the Custom design template card and switch it on. This is the card's master switch — it's off by default, and nothing changes until you turn it on.
Once you have templates running, the card title shows how many — Custom design template (2).
Pick a template to edit: Full layout, Product card, Category tabs, Sidebar, or Toast.
The editor opens pre-filled with a working copy of the built-in design for that template. Edit it.
Turn the template's own switch on. The app compiles your code for you at that moment — if there's a mistake, the switch stays off and the error appears in red with the line number.
Click Save.
Both switches must be on
The card's master switch and the individual template's switch. If either is off, shoppers see the built-in design for that piece.
Once a template's switch is on, the live preview on the Design tab switches to your version immediately, so you can check your work before saving. Keep editing and click Compile to push each change into the preview.
The buttons
| Button | What it does |
|---|---|
| Compile | Converts your JSX into something the storefront can run, and updates the preview. Turning the switch on does this automatically the first time — you only need this button when reworking an already-active template. Nothing reaches your store until you also click Save. |
| Format | Tidies up indentation. Cosmetic only. |
| Reset to default | Puts the built-in starting template back. Your edits are lost — there's no undo. |
The badges
| Badge | Meaning |
|---|---|
| Active / Inactive | Whether this template is currently the one shoppers see. |
| Edited — compile to apply | You changed the code since the last successful compile. The preview and your shoppers still see the previously compiled version until you click Compile. |
The props reference is in the editor
Under each editor is a collapsible <template name> props reference — for example Full layout props reference. It lists every prop that template receives, straight from the app, so it's always current. Use it as you write; these docs cover the same ground with recipes and context.
Save vs. compile vs. publish
These are three separate steps, and it's easy to think one covers another:
| Step | What it actually does |
|---|---|
| Compile | Turns your JSX into runnable code and updates the preview only. |
| Save | Writes your builder, including the compiled template, to the database. |
| Publish | Makes the builder (and any active custom templates) live on your storefront. See Publish your builder. |
Compiling without saving means your next visit to the editor starts from the last saved version, not your unsaved edits. Saving without the builder being published means shoppers still see nothing.
Go back at any time
Turn a template's switch off and save — the built-in design returns immediately, and your code stays in the editor for later. Reset to default is the only action that actually discards your code.