
Dashboard tour
What the app's Home page shows: the summary cards, the Setup Guide, the Bundle deals table, its columns and its row actions.
The app's Home page is where you create, switch on and manage your deals. In your Shopify admin, open Apps → Oxify - Product Bundles; Home is the page the app opens on.
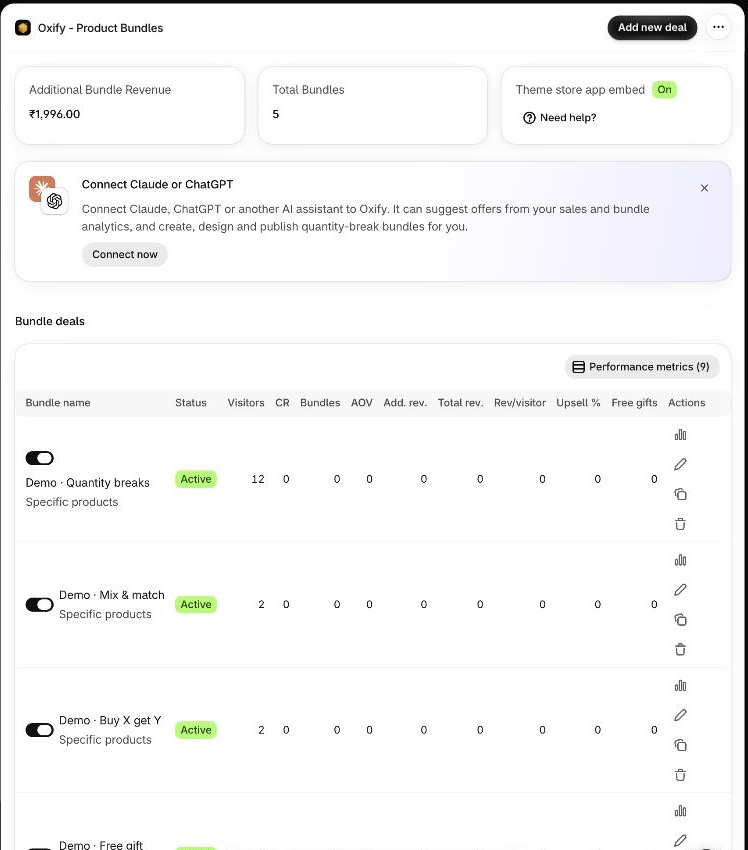
Click Add new deal at the top right to start a new deal. It opens the template screen.
The summary cards
| Card | What it shows |
|---|---|
| Additional Bundle Revenue | Extra revenue your bundles have generated, in your store currency. |
| Total Bundles | How many deals you have, live or not. |
| Theme store app embed | A green On or yellow Off badge: whether the app can render on your storefront. While it is Off the card has an App embed Settings button that opens your theme editor; once it is On the button reads Need help?. See Enable the app embed. |
The Setup Guide
A new store sees a Setup Guide card above the table. It has two steps and a progress line (0 / 2 completed, then Done):
- Activate Oxify Product Bundles — the Activate button opens your theme editor on the app embeds. Once the embed is on, the button goes away.
- Create your first bundle — the Create Bundle button starts a new deal.
The guide disappears by itself when both steps are done. To hide it sooner, click the X at its top right. The arrow next to the X folds the card up without hiding it. The demo store in these screenshots has finished both steps, so no guide shows.
Connect Claude or ChatGPT
The Connect Claude or ChatGPT card is an invitation to connect an AI assistant to the app. Its Connect now button only takes you to the AI assistant (MCP) section of Settings, where the connector address and key are; it connects nothing by itself. Click the X on the card to hide it. The browser remembers that you did. See AI assistant for how the connection works.
The Bundle deals table
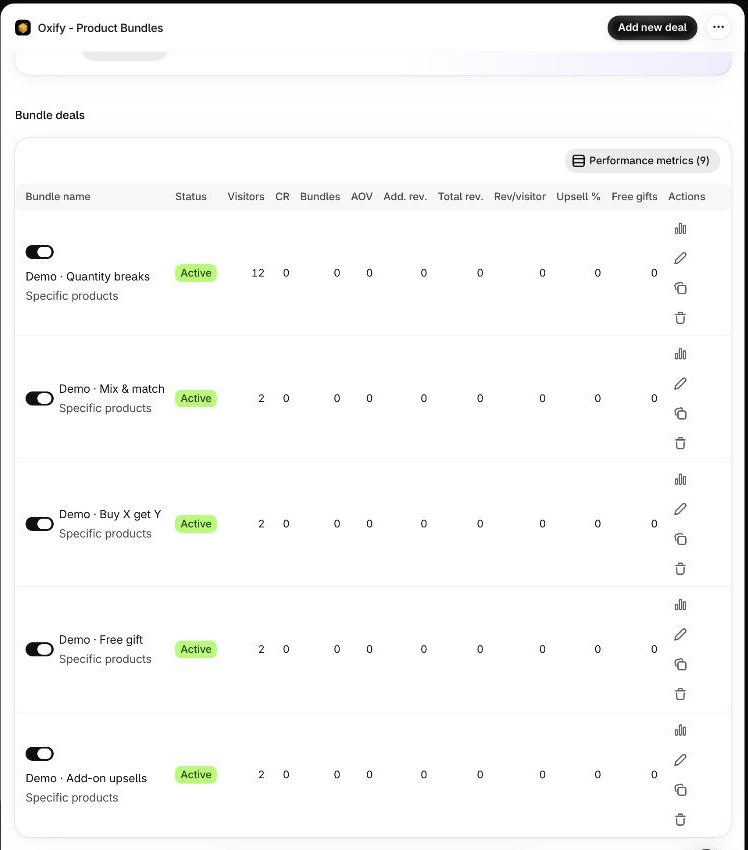
Each row is one deal. Click the deal's name (or anywhere else in the row except the switch and the icons) to open it in the editor. A new store with no deals sees No Bundle Sets and a Create Bundle Set button instead of the table.
| Column | What it shows |
|---|---|
| Bundle name | A switch, the deal's name, and under the name its visibility: All products, Specific products, Specific collection or All products excluding specific. The switch publishes or unpublishes the deal. |
| Status | Active (published) or Inactive. |
| Visitors | The number of visitors who saw this deal's offer. |
| CR | Conversion rate: the share of visitors who made a purchase. |
| Bundles | The share of buyers who bought a bundle instead of a single item. |
| AOV | Average order value: total revenue divided by the number of sales. |
| Add. rev. | Additional revenue from bundles. If a product costs $10 and a 2-pack with 10% off sells for $18, the extra revenue counted is $8 ($18 minus the $10 single-item price). |
| Total rev. | Revenue from the products in this deal, counting single-item sales and bundle sales. |
| Rev/visitor | Total revenue divided by the number of visitors. |
| Upsell % | The share of bundle orders that also included an upsell item. |
| Free gifts | Free gifts handed out through this deal, regular and progressive ones. |
| Actions | Four icons, described below. |
Hover a column heading to read its definition in the app.
Choose which columns show
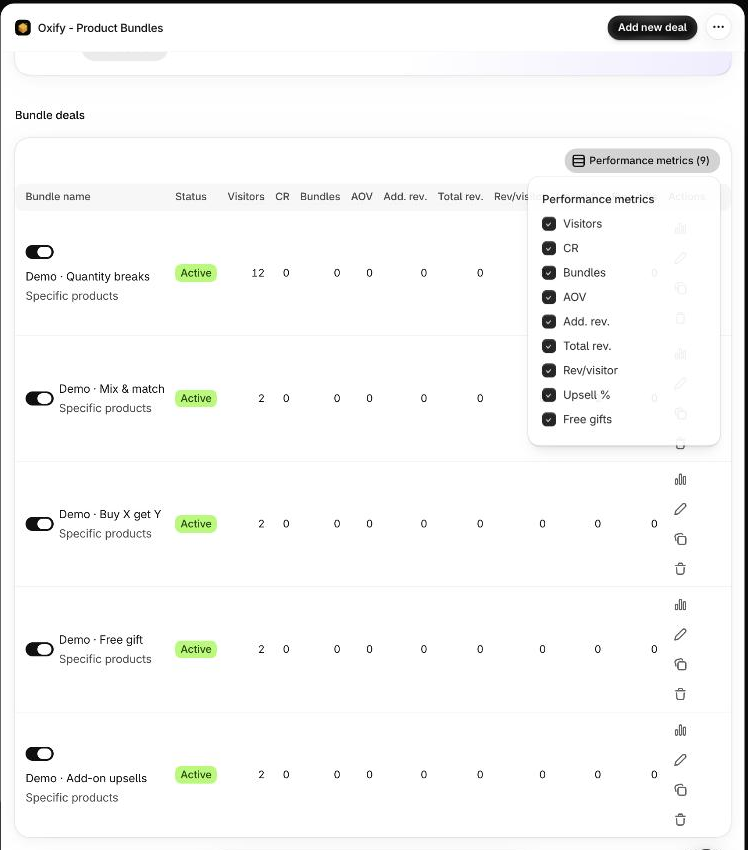
The Performance metrics (9) button above the table opens a list with a tick box for each of the nine performance columns, from Visitors to Free gifts. Untick the ones you don't need; the number on the button counts the columns that are on. Your choice is remembered in your browser, not in your store, so a colleague or another browser starts with all nine.
Row actions
Hover an icon in the Actions column to see its name.
| Icon | Name | What it does |
|---|---|---|
| Chart | View Analytics | Opens Analytics filtered to this deal. |
| Pencil | Edit Bundle Settings | Opens the editor. |
| Copy | Duplicate Bundle | After you confirm, creates a copy with the same settings. The copy is named your deal's name (copy) and starts Inactive, so it doesn't reach shoppers until you publish it. |
| Bin | Delete Bundle | After you confirm (This action cannot be undone), permanently removes the deal. |
| — | Change Status (the switch) | Publishes or unpublishes straight away, without opening the editor. A toast says Bundle published or Bundle unpublished. |
Publishing and duplicating need an active plan
The app is billed through Shopify. Publishing a deal, saving changes to it and duplicating it all need an active plan (a free trial counts). See Plans and billing.
Deals running an A/B test
A deal that is running an A/B test shows an A/B test (N variants) badge and how long the test has run, next to its name. The small arrow beside the badge (Expand variants / Collapse variants) lists each variant as its own row with its own figures. These deals also get an End A/B test button in the Actions column. It opens a table comparing the variants; you pick the winner, all traffic goes to it, and the other variants are archived. The winner becomes the main version (Variant A).
Too many published deals
Your published deals share limited room in the checkout discount. When they don't all fit, a red message appears when you save or publish, such as 3 of 4 published bundles are active at checkout. 1 will NOT be discounted at checkout, with a Manage bundles button that brings you back here. Unpublish the deals you no longer need. See Discount not applying at checkout.